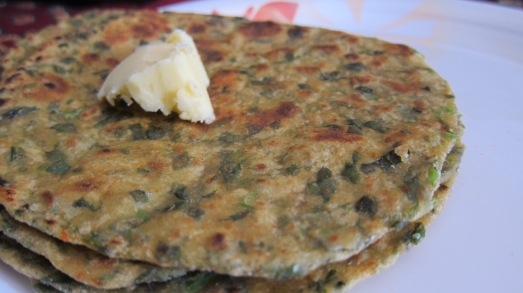
Methi (Fenugreek), is one of my favorite vegetables… I love Methi Paranthas…
Being from Mussoorie, a cold place, we used to eat a lot of methi… Methi paranthas, almost everyday for breakfast… I may not be introduced to cooking when was young but was definitely introduced to chopping… I used to love chop vegetables, but really fine… So methi was something my mother used to clean only when I was around, so that I can chop it finely for her…
I became famous in Mussoorie for chopping Methi.. 🙂 Yeah seriously no kidding.. 🙂 One of my neighbours got 3-4 bunches of Methi (those huge bunches) and my mom said that Sheelu will chop them for you… Next day she comes says that her son really liked the aaloo methi she prepared… Only then I came to know that, it makes a huge difference in the taste of the food, by the way you chop your veggies.. 🙂 It was a proud moment for me.. and I still religiously follow the same way of chopping.. 🙂
Preparation Time:- 1/2 hr | Cooking Time:– 5 mins per parantha | Serves:- 5-6 paranthas
INGREDIENTS:
- 2 cups whole Wheat Flour (Gehun ka aata)
- 4 cups Fresh Fenugreek Leaves (Methi)
- Salt to taste
- 1/2 tea spoon Red Chilli Powder (Lal Mirch powder)
- Ghee/oil to fry the parantha (I prefer ghee :))
PREPARATION:
Clean the Methi and chop it finely. Wash the chopped leaves properly. There can be lots of soil in the methi, so make sure to wash it thoroughly.
Take the flour in a big pan, add salt and chilly powder to it. Add the washed methi to it. Now knead in a tight dough using minimum water. Methi can leave some water so make sure that you don’t use too much of water, while kneading.
Cover the dough and leave it for around 15 minutes.
Now take some dough and after rubbing it with some dry flour, start making a parantha using a rolling pin. The dough can be realy sticky, so you can refrigerate it for 15 mins.
After rubbing with some dry flour, start rolling the parantha evenly. You need to roll like a normal parantha.
Heat the tawa (non-stick can be used) and place the parantha on it. (Don’t use any oil yet.)
Once some blisters start appearing on the showing end then turn over the parantha. Now apply some ghee evenly on the showing end. Turn over the parantha, and apply some ghee on this end as well.
Start pressing the parantha using a flat spatula in order to cook properly. Once the parantha starts becoming crispy simmer the stove and dig in the spatula at several places on the parantha. This helps the parantha to get cooked from between also as the ghee seeps in.
Cook properly from both the sides by turning over at regular periods.
- Serve hot with Green Dhaniya chutney (Coriander Leaves Chutney) or tomato ketchup.
- Try it at tea time/breakfast with a hot cup of tea and Amul Butter or Homemade white butter.
- Try it for dinner with curd.
Tasty Cooking..!!
Sending this recipe to:
Favorite Recipes Event: Vegetarian Recipes.
Cooking Whole Foods–Whole Wheat Flour & Cooking with Whole Foods Main Event


![IMG_5362 - Copy_thumb[1]](https://cookcookandcook.wordpress.com/wp-content/uploads/2012/10/img_5362-copy_thumb1.jpg?w=300&h=201)
![only lunch box_thumb[1]](https://cookcookandcook.wordpress.com/wp-content/uploads/2012/10/only-lunch-box_thumb1.png?w=523)
lovely, my fav!!
LikeLike
you must do a post on the chopping of methi. 🙂 These look heavenly.
LikeLike
Thank you Pallavi.. Will try to figure out how to make a post for the chopping.. 🙂
LikeLike
even i m famous for cutting and chopping of the veggies at home..my mom specially used to give me the work of chopping gawar fali..too tedious but when when u get the accolade..its worth it..
LikeLike
hehe.. yeah Suhani.. 🙂
LikeLike
very nutrituous and healthy paratha.. love the methi flavor!!
Thanks for linking it to my event!! Looking for more yummy recipes!!
Sowmya
Ongoing Event – CWF – Whole Wheat Flour
LikeLike
Pingback: 19 Delicious Paranthas Everyone Should Definitely Try
Pingback: 19 Delicious Paranthas Everyone Should Definitely Try | Pakoda News
Pingback: Plash | 19 Delicious Paranthas Everyone Should Definitely Try - Plash